Modern marketing websites increasingly operate as structured data pipelines rather than static lead capture pages. When someone submits a form, the information collected rarely tells the full story. Sales teams want to know company size, industry, revenue, and other signals that indicate whether a lead fits their target market.
This is where ZoomInfo API integration becomes valuable. ZoomInfo provides one of the largest B2B contact and company intelligence databases, allowing organizations to enrich leads with firmographic and contact data in real time.
When ZoomInfo is connected to Webflow, form submissions can be enriched automatically before they reach a CRM or marketing automation system. Instead of sending raw form data downstream, the website becomes the first stage of a structured lead intelligence workflow.
This guide explains how to implement a ZoomInfo Webflow integration, how the API architecture works, and how to build a lead enrichment pipeline from Webflow forms.
Here’s what we’ll cover:
- What ZoomInfo is and why integrate it with Webflow
- What you need to get started
- Techniques for integrating ZoomInfo with Webflow
- Step-by-step: Enriching Webflow form submissions
- Step-by-step: Using ZoomInfo for visitor and company intelligence
- Step-by-step: Connecting Webflow to ZoomInfo via API or middleware
- Best practices for ZoomInfo + Webflow
- Common challenges and troubleshooting
- The future of data-aware websites
Why Integrate ZoomInfo With Webflow
Webflow provides exceptional flexibility for building modern marketing websites. Design teams can create sophisticated layouts and structured CMS architectures while maintaining full control over performance and content systems.
However, Webflow forms by default capture only the information a visitor enters manually. For B2B companies, that often leaves critical context missing.
A ZoomInfo integration solves this by enriching form submissions with company intelligence. Once an email address or company domain is captured, ZoomInfo can append additional data points such as industry classification, employee count, revenue estimates, and contact role information.
This improves several parts of the marketing pipeline.
Lead quality improves because sales teams can immediately see whether a company matches their target profile. Marketing automation becomes more precise because segmentation can rely on enriched firmographic data. CRM workflows also become easier to manage since records enter the system already populated with structured company information.
For many organizations, this transforms a website form from a simple lead capture tool into a high quality data source.

What You Need to Get Started
Before you begin, make sure you have:
- A ZoomInfo account with access to the ZoomInfo API or enrichment features
- A Webflow CMS or Business Site plan that allows form handling, webhooks, and custom code
- Access to Zapier, Make, or another automation platform if you plan to connect Webflow forms through middleware
- Admin access to your CRM or marketing automation platform such as HubSpot, Salesforce, or Marketo so enriched leads can be stored and routed correctly
Optional but helpful:
- Google Tag Manager (GTM) for managing tracking scripts and analytics integrations
- A developer or technical marketer who can configure webhook endpoints or implement a ZoomInfo API integration if you plan to build a custom workflow
Integration Architecture
Before implementing the integration, it helps to understand how the data flows between systems. A typical ZoomInfo Webflow integration follows a simple four-step architecture:
Webflow Form
↓
Webhook Endpoint
↓
ZoomInfo API
↓
CRM or Database
The Webflow form captures a lead’s information such as name, email address, and company domain. Once the form is submitted, Webflow sends the data to a webhook or backend endpoint.
That endpoint calls the ZoomInfo enrichment API, which returns company and contact intelligence. The enriched data is then stored in a CRM or marketing automation platform where sales and marketing teams can use it for segmentation and outreach.
This architecture keeps Webflow focused on user experience while external services handle enrichment and data processing.
Step 1: Capture Leads in Webflow Forms
The first step in any ZoomInfo API integration is configuring the Webflow form that will collect lead data. Create a form inside Webflow with fields such as:
- Name
- Business email address
- Company name or domain
ZoomInfo enrichment works best when the email address belongs to a company domain rather than a personal provider. Corporate email addresses allow the enrichment API to match a contact to the correct organization.
Once the form is created, publish the Webflow site so submissions can be captured.
At this stage, Webflow is responsible only for collecting user input. The next step is sending that information to an external system for processing.
Step 2: Send Form Data Using a Webflow Webhook
Webflow allows form submissions to trigger webhooks, which send form data to an external endpoint. To configure this:
- Open Webflow Project Settings
- Navigate to Integrations
- Select Webhooks
- Create a new webhook for Form Submission
The webhook URL should point to a backend endpoint or serverless function that will handle the API request to ZoomInfo.
When a visitor submits the form, Webflow sends a JSON payload similar to this:
{
"name": "Jane Smith",
"email": "jane@company.com",
"company": "Company Inc"
}
This payload becomes the input for the ZoomInfo enrichment request.
Step 3: Send Lead Data to the ZoomInfo API
Once the webhook receives the form data, the next step is calling the ZoomInfo enrichment API. The backend endpoint sends a request containing the lead’s identifying information. Most implementations include the email address and name.
Example request:
POST https://api.zoominfo.com/enrich/contact
Authorization: Bearer YOUR_ZOOMINFO_API_KEY
Content-Type: application/json
Request body:
{
"email": "jane@company.com",
"firstName": "Jane",
"lastName": "Smith"
}
ZoomInfo uses this information to search its B2B contact database and identify the associated company and contact profile.
This step is the core of the ZoomInfo API integration, since it transforms basic form submissions into enriched business intelligence.
Step 4: Enrich the Lead With ZoomInfo Data
If the API finds a match, ZoomInfo returns additional firmographic and contact data. A typical response might look like this:
{
"company": "Company Inc",
"industry": "Software",
"employeeCount": 320,
"revenueRange": "50M-100M",
"location": "New York"
}
This data significantly expands the usefulness of the original form submission.
Instead of receiving only a name and email address, the system now includes company size, industry classification, and revenue range. These attributes are essential for lead scoring and account based marketing strategies.
At this point, the lead record has been enriched and can be routed into downstream systems.
Step 5: Store Enriched Data in Your CRM
The final step in the ZoomInfo Webflow integration workflow is storing the enriched record in a CRM or marketing platform. Most organizations send enriched leads to systems such as:
- HubSpot
- Salesforce
- Marketo
- Airtable
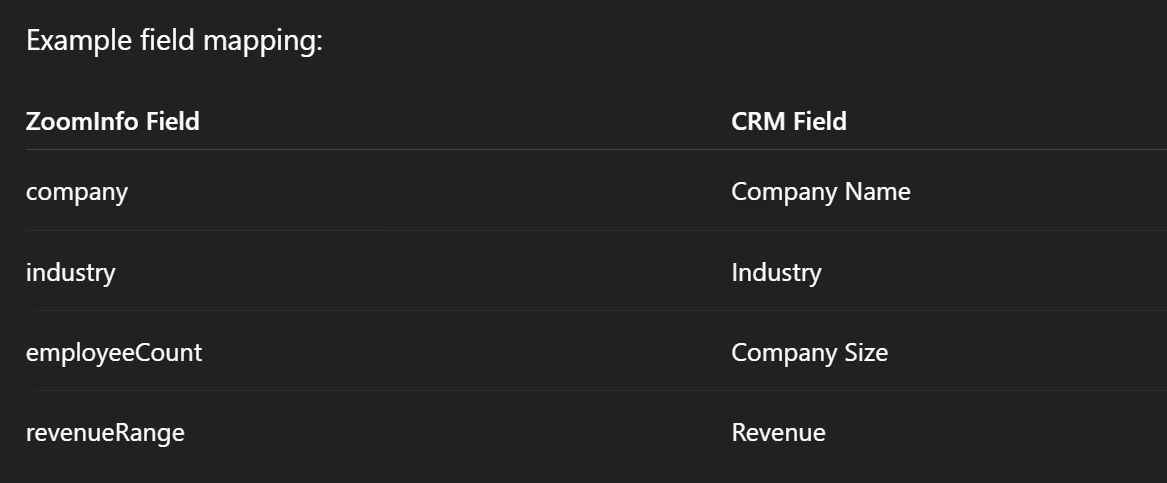
When storing the data, it is important to map ZoomInfo fields to the correct CRM properties. Example field mapping:
Once the data is stored, marketing automation workflows can trigger segmentation, scoring, and lead routing.
The entire process then runs automatically each time a visitor submits a Webflow form.
Alternative Implementation: Middleware Automation
Not every organization wants to build a custom API endpoint.
Many teams implement a ZoomInfo Webflow integration using automation platforms such as Zapier or Make. These tools can receive Webflow form submissions, call external APIs, and forward enriched data to a CRM.
The workflow typically looks like this:
Webflow Form
→ Automation Platform
→ ZoomInfo API
→ CRM
This approach requires less engineering work and is often sufficient for early stage marketing teams.
The Future of Data-Aware Websites
Marketing websites increasingly function as the entry point to complex data ecosystems. Form submissions are no longer isolated conversions. They are signals that feed marketing automation systems, CRMs, and enrichment platforms.
Integrations like ZoomInfo demonstrate how this infrastructure is evolving. When enrichment occurs immediately after a form submission, marketing and sales teams receive a far clearer picture of who is interacting with the site.
Designing these systems requires thinking about both the user experience and the underlying data architecture. A modern Webflow agency often considers how forms, APIs, and marketing platforms connect long before a page goes live.
If you are exploring ways to structure your website around better lead intelligence and scalable integrations, learn more about our development approach.
Explore additional articles and frameworks in the Composite insights library.