Shopify powers millions of online stores worldwide, offering powerful eCommerce infrastructure, inventory management, and payment processing. Webflow, on the other hand, is where design flexibility thrives as a platform that lets teams craft fully customized front-end experiences.
By integrating Shopify with Webflow, brands can get the best of both worlds: Webflow’s design freedom and Shopify’s reliable checkout and backend management. Whether you’re running a small online store or managing a large retail operation, connecting the two platforms helps streamline workflows and elevate your brand’s shopping experience.
This guide walks through different integration options, their pros and cons, and when to choose each, along with best practices for maintaining performance and consistency across both systems.
Here’s what we’ll cover:
- What is Shopify and why integrate it with Webflow
- What you need to get started
- Techniques for integration
- Step-by-step: Using Shopify Buy Buttons
- Step-by-step: Embedding a Shopify storefront
- Step-by-step: Using APIs or third-party tools
- Best practices for Shopify + Webflow
- Common challenges and troubleshooting
What is Shopify and Why Integrate It with Webflow
Shopify is a leading eCommerce platform that handles everything from product listings and inventory to checkout and payments. It’s robust, secure, and designed for scaling, but it can be visually limiting without heavy theme customization.
Webflow, on the other hand, excels at front-end design and CMS flexibility. It gives you full visual control, allowing you to design rich, branded shopping experiences without being locked into a template system.
Integrating Shopify with Webflow allows you to:
- Use Shopify for product management while maintaining Webflow’s visual freedom.
- Embed products or collections directly into your Webflow pages.
- Leverage Shopify’s secure checkout without managing sensitive payment data on your site.
- Combine the scalability of Shopify with the design precision of Webflow.
This setup is ideal for brands that want to keep a custom marketing or content-focused site in Webflow while still selling through Shopify.
What You Need to Get Started
Before you begin, make sure you have:
- A Shopify account (Basic plan or higher).
- A Webflow site with CMS or Business hosting.
- Access to your Shopify product catalog and checkout settings.
- A basic understanding of embedding custom code in Webflow.
Optional but useful:
- Shopify’s Buy Button sales channel enabled.
- Familiarity with Shopify’s Storefront API if pursuing a more advanced integration.
- Google Tag Manager or Clarity for analytics and conversion tracking post-integration.
Techniques for Integrating Shopify with Webflow
There are three primary methods to integrate Shopify with Webflow, depending on your goals and technical comfort level.
1. Shopify Buy Button (Recommended for Most Users)
The simplest and most reliable integration method is to use Shopify’s Buy Button, an embeddable widget that connects your Webflow site to your Shopify checkout.
Implementation Steps:
- In Shopify, go to Settings → Apps and Sales Channels → Shopify App Store → Search for and install Buy Button.
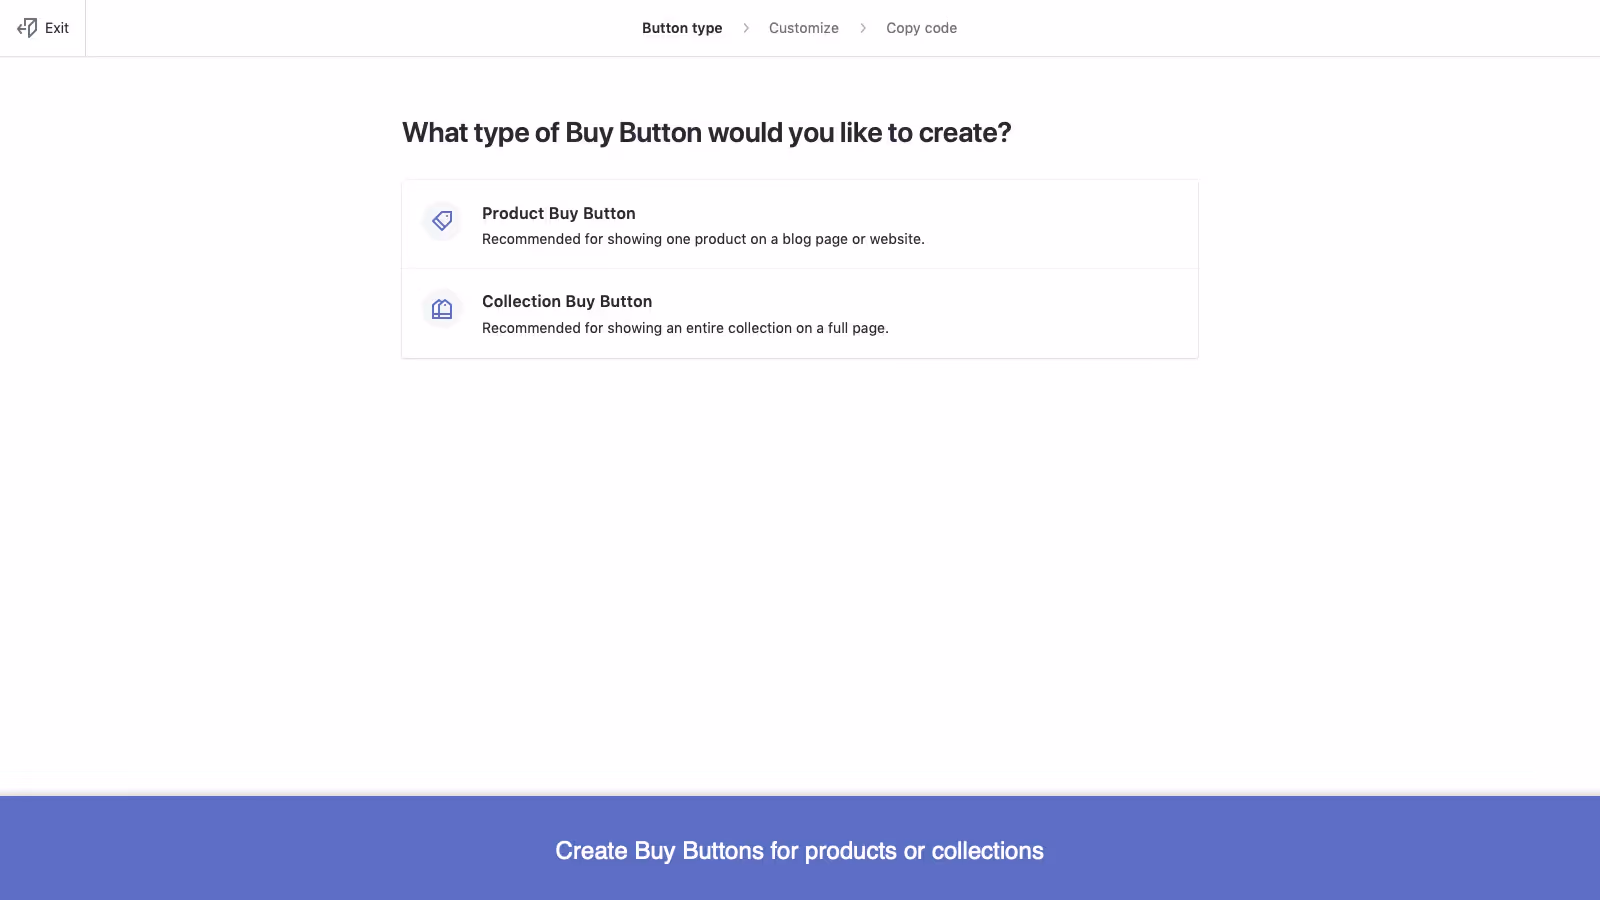
- Select the product or collection you want to embed.
- Customize button styles, layout, and behavior (e.g., “Add to Cart” or “Buy Now”).
- Copy the generated embed code.
- In Webflow, create a CMS Collection (if using dynamic embed) with fields such as Product component and Product ID as described in Webflow’s docs.
- Add an Embed element (or dynamic embed inside a collection template), paste the code, and replace the static IDs with your CMS fields if applicable.
- Publish your site.
Pros:
- Quick to set up, minimal development needed.
- Uses Shopify’s secure checkout by default.
- Supports embedding single products, collections, or dynamic embeds via Webflow CMS.
Cons:
- Custom styling is limited; deeper layout changes require CSS overrides.
- Checkout redirects users to Shopify’s domain.
- Doesn’t natively support full Webflow cart behavior or complex interactions without additional scripts.
Best for:
Smaller catalogs, simple storefronts, and use cases where you want fast, reliable integration without full backend sync.
2. Shopify Storefront Embed (More Flexible Design Control)
This method gives you more control over how products are displayed by fetching real product data and embedding it dynamically into Webflow.
Implementation Steps:
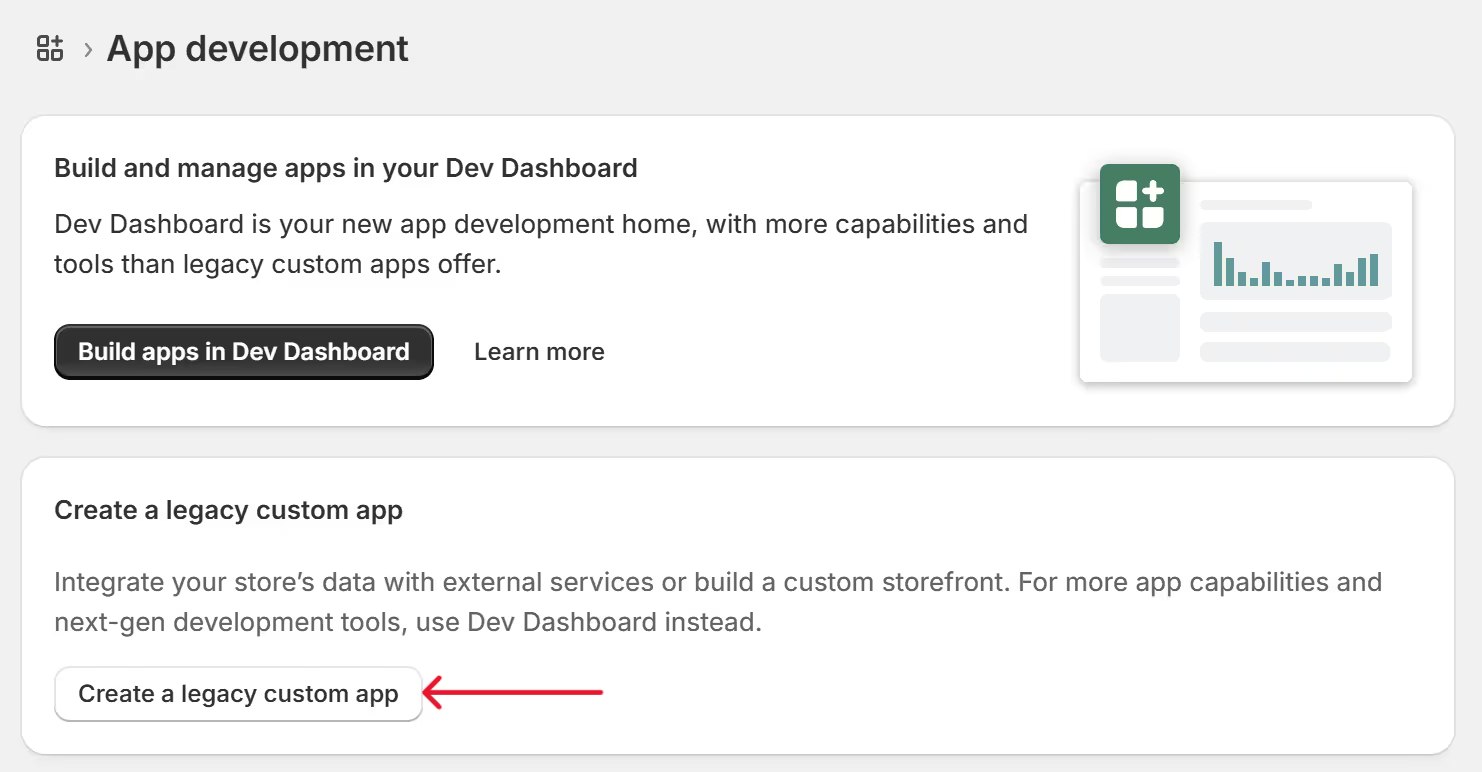
- In Shopify Admin, go to Settings → Apps and sales channels → Develop apps.
- If custom app development isn’t enabled, click Allow legacy custom app development.
- Create a new legacy custom app, name it, and assign a developer.
- Under the app’s Configuration / API scopes, enable the Storefront API permissions you’ll require (e.g. read products, checkout, etc.).
- Save and Install the app.
- Navigate to API credentials within that custom app and reveal the Storefront access token.
- Use that token with Shopify’s GraphQL Storefront API or Buy SDK to query product data (name, image, price, variants, etc.).
- In Webflow, embed custom code (or use CMS + embed blocks) that uses the data fetched from the Storefront API to render your product listings dynamically.
- Connect “Add to Cart” or “Buy Now” buttons to Shopify’s checkout flow or mutations via the Storefront API.
Pros:
- Full design flexibility: your Webflow layout isn’t constrained to a widget style.
- Real-time product data pulled directly from Shopify.
- You can layer custom interactions (e.g. dynamic variant updates).
Cons:
- Needs developer support or JS knowledge.
- More setup and maintenance overhead than simple embeds.
- Still offloads checkout and payments to Shopify’s backend.
Best for:
Brands that want Webflow’s CMS and presentation layer to drive the UX while Shopify handles commerce under the hood.
3. API / Middleware / Sync Integration (Advanced / Automated)
For full automation and synchronization between Shopify and Webflow, middleware tools and APIs let you sync product data, inventory, and sometimes order info between the two platforms.
What It Enables:
- Two-way sync of product data (title, price, media, variants) between Shopify and Webflow CMS.
- Automated inventory updates and price changes from Shopify.
- Dynamic product pages in Webflow that reflect live Shopify data.
- Better alignment between frontend design and backend commerce.
Implementation Options:
- Whalesync offers a Shopify connector that allows syncing Shopify products into Webflow CMS.
- Shopyflow lets you build fully visual, synced storefronts inside Webflow, with Shopify powering the backend.
- Custom API: Use Shopify’s GraphQL Storefront API or Admin API to build your own sync and fetch logic.
Pros:
- Real-time product data and inventory consistency.
- Greater design control on the Webflow side while leveraging Shopify’s commerce engine.
- Scalable for larger catalogs or multiple storefronts.
Cons:
- Requires configuration or setup of third-party tools (may incur cost).
- Some tools may have limitations in syncing certain Shopify features (e.g. inventory across locations).
- Greater complexity in troubleshooting and maintaining sync logic.
Best for:
Growing or enterprise-level brands that want seamless automation and consistency between Shopify’s backend and Webflow’s frontend design.
Compliance Note: Staying Within Shopify’s API Terms
All integration methods described in this guide follow Shopify’s official API Terms of Use. Using the Buy Button, Storefront API, or Custom App credentials to display products or trigger Shopify checkout flows is fully permitted.
However, merchants should always process payments through Shopify’s secure checkout and avoid handling transactions directly on external sites like Webflow. Likewise, sensitive customer or order data must remain within Shopify’s ecosystem or approved apps.
When configured correctly, connecting Webflow and Shopify this way provides a compliant, “headless commerce” approach, maintaining Shopify’s security and performance standards while unlocking Webflow’s design flexibility.
Best Practices for Shopify + Webflow Integration
- Keep checkout secure: Always route transactions through Shopify to maintain PCI compliance.
- Unify design systems: Match your Webflow product page styling to Shopify’s checkout experience for consistency.
- Track conversions accurately: Use GTM or Clarity to monitor add-to-cart and checkout events.
- Limit embedded scripts: Too many embeds can slow page load times, so test performance regularly.
- Plan for scaling: If your product catalog or order volume grows, consider transitioning to a partial or full Shopify front-end.
Common Challenges
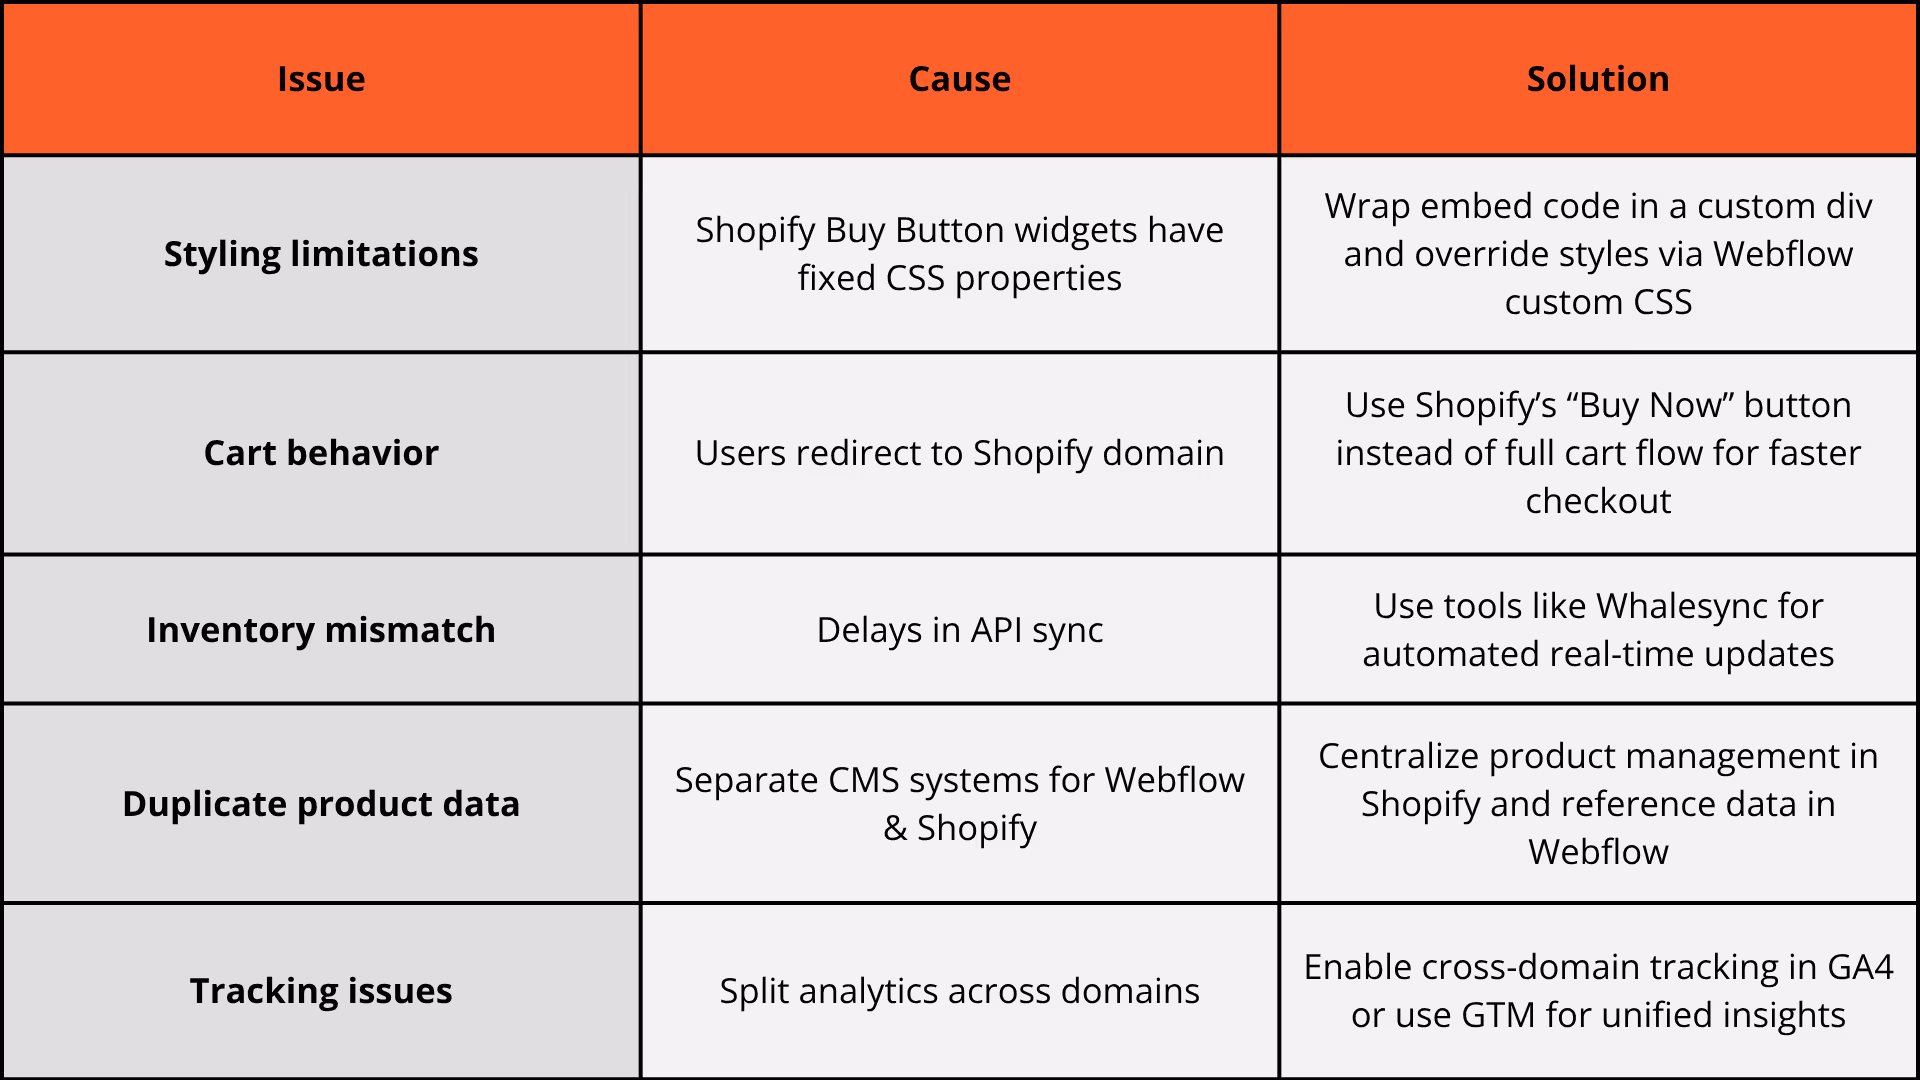
Conclusion
Integrating Shopify with Webflow lets you design the storefront you want, without giving up the eCommerce backbone you need.
From simple Buy Buttons to full API integrations, Shopify and Webflow together offer a flexible way to combine storytelling, design, and conversion power. Whether you’re launching a boutique product line or scaling a multi-region marketplace, this hybrid setup allows you to sell seamlessly while maintaining complete creative control.
At Composite, we’ve helped brands blend Shopify’s transaction reliability with Webflow’s design precision, especially in industries where the site must sell as effectively as it tells a story.
Thinking about integrating Shopify with Webflow? Let’s talk.