


Google Tag Manager (GTM) is a free tool by Google that lets you easily manage and deploy marketing and analytics tags, like Google Analytics, Meta Pixel, and LinkedIn Insights, all from one dashboard.
For Webflow users, integrating GTM means you can track user behavior, conversions, and performance without editing code every time. Instead, you add your GTM container once, and manage everything directly from Google’s interface.
As a Webflow-focused UX agency, Composite regularly helps clients integrate GTM into their sites for analytics, campaign tracking, and privacy compliance. This guide outlines the different integration methods, their pros and cons, and best practices to help you implement GTM effectively.
Here’s what we’ll cover:
- What is Google Tag Manager?
- What you need to get started
- Techniques for integration
- Step-by-step: Direct embed setup
- Step-by-step: Embed using custom code
- Step-by-step: Managing multiple tags
- Best practices for GTM + Webflow
- Common challenges with GTM integrations
What is Google Tag Manager?
Google Tag Manager is a tag management system that simplifies how you add and control scripts on your website. Instead of editing your site’s code each time you want to add a tracking tag, you paste a single GTM container code once, then use GTM’s dashboard to manage all future tags.
With GTM, you can:
- Deploy analytics tools like Google Analytics 4 (GA4), Microsoft Clarity, or Hotjar.
- Add conversion pixels for Google Ads, Meta, LinkedIn, or TikTok.
- Fire scripts based on specific user actions like button clicks, form submissions, or scroll depth.
- Preview, debug, and roll back tag changes with version control.
GTM acts as the central hub for marketing data, allowing non-developers to make powerful updates while keeping your Webflow codebase clean and secure.
.avif)
What You Need to Get Started
Before you begin, make sure you have:
- A Webflow site (published with a custom domain).
- A Google Tag Manager account (free at tagmanager.google.com).
- A Google account with permission to manage the workspace.
Optional but helpful:
- A connected Google Analytics 4 property.
- Access to other third-party pixels (Meta, LinkedIn, etc.).
- Consent or cookie banner setup (for GDPR/CCPA compliance).
Techniques for Integrating Google Tag Manager with Webflow
There are three main approaches to connecting Google Tag Manager (GTM) with your Webflow site:
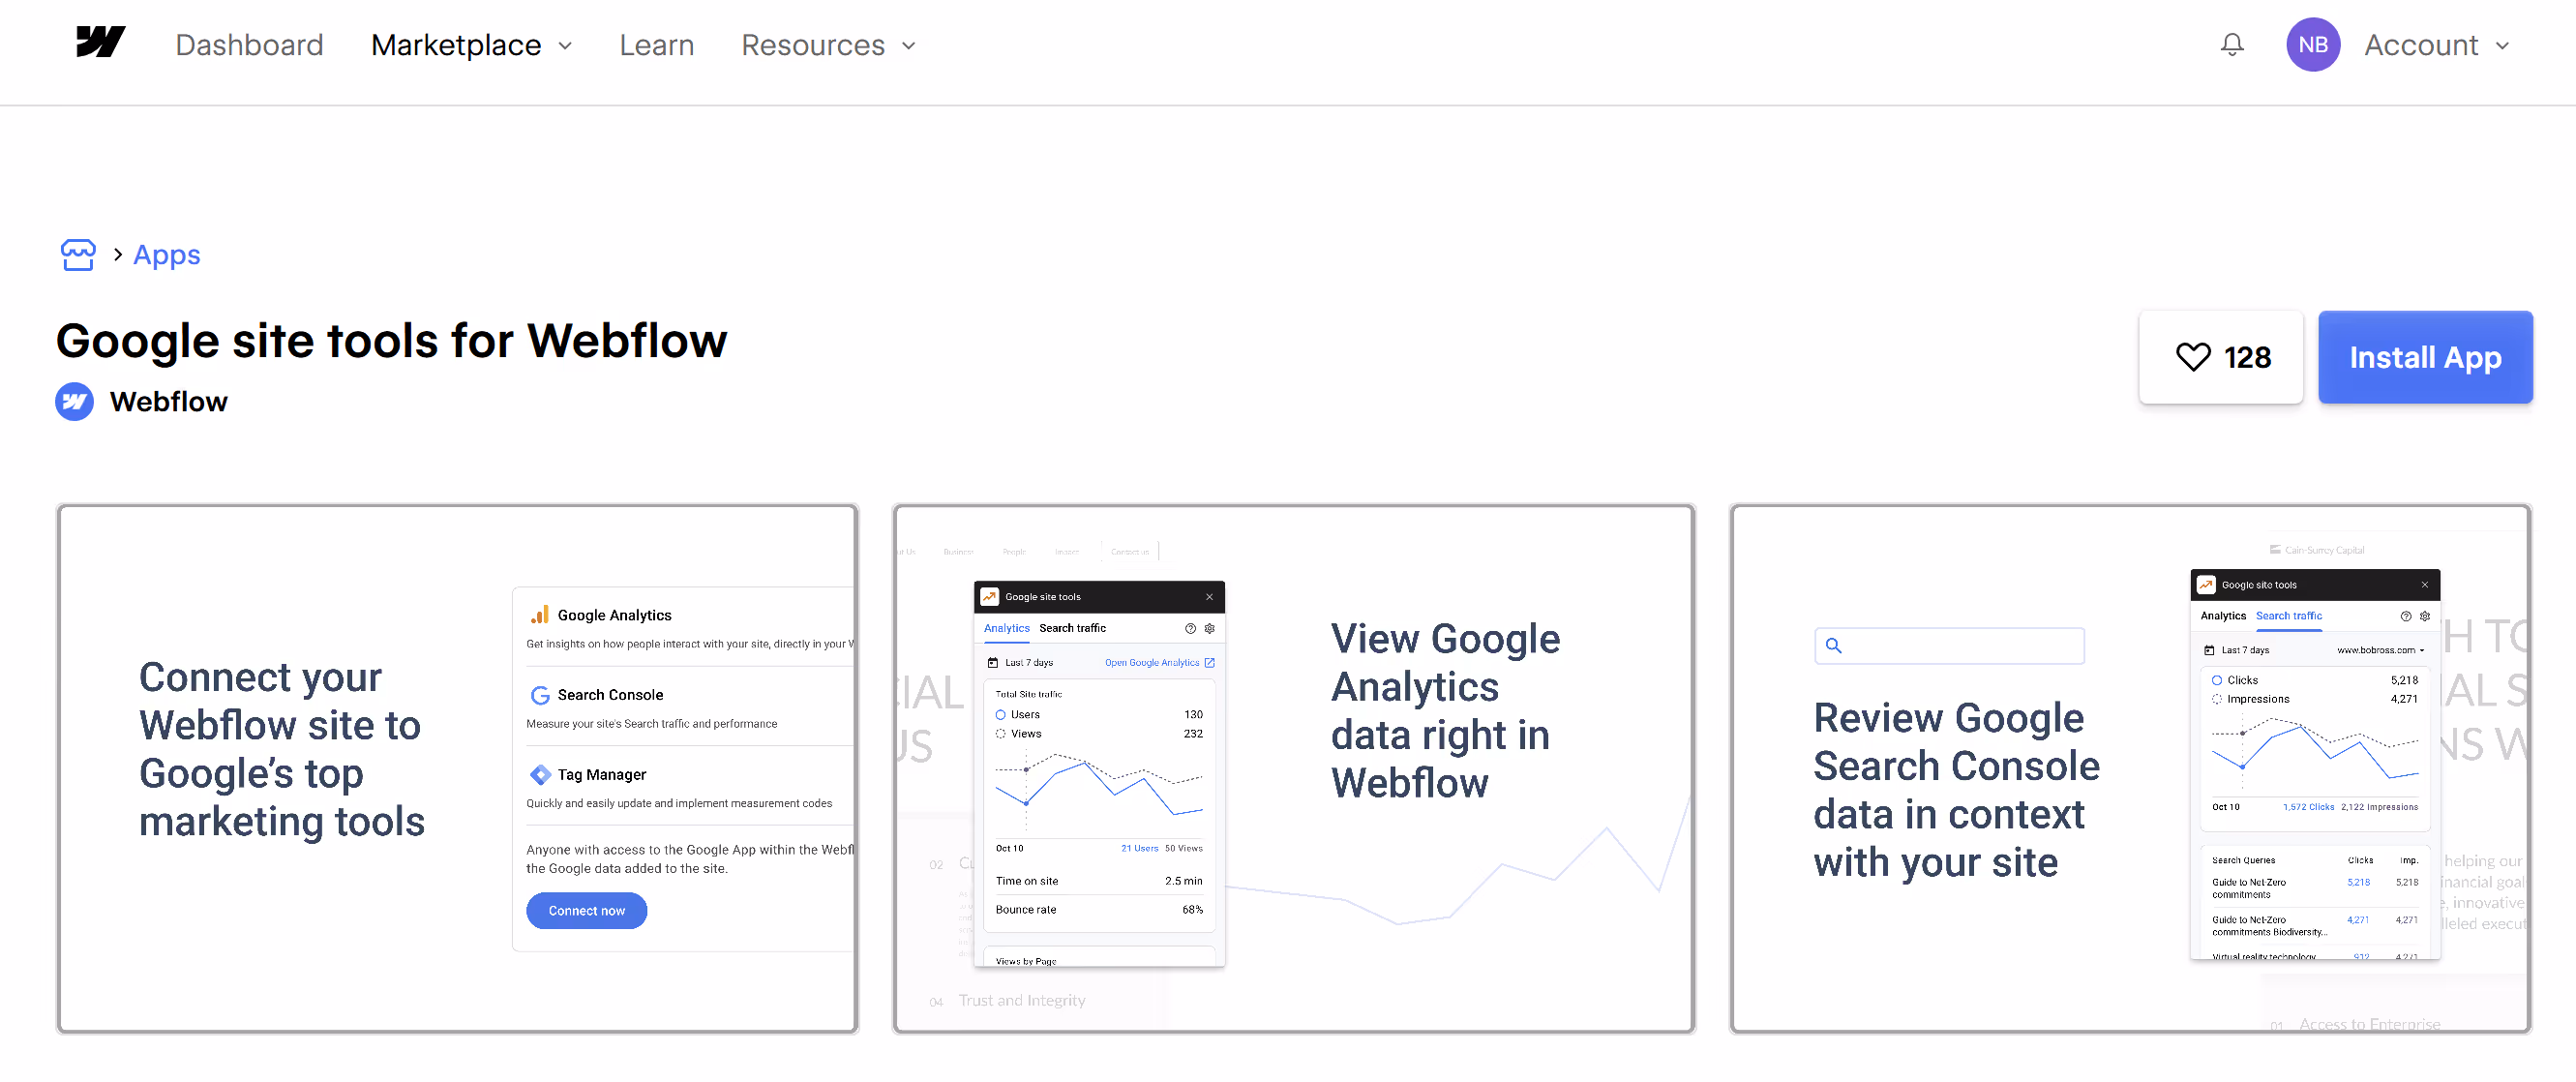
1. Google Site Tools for Webflow App (Recommended)
Webflow’s official Google Site Tools app now provides a guided, code-free setup for GTM, Google Analytics (GA), and Google Search Console (GSC).
This approach handles authentication and automatically injects scripts into your site for a unified Google integration.
Pros:
- Easiest method; no manual code edits required.
- Automatically connects GA, GSC, and GTM through one interface.
- Streamlined permissions for teams managing multiple projects.
Cons:
- Limited flexibility for page-specific or environment-specific setups.
- Requires use of the Webflow App Marketplace.
Best for: Standard site-wide implementations or marketing teams managing multiple Google integrations.
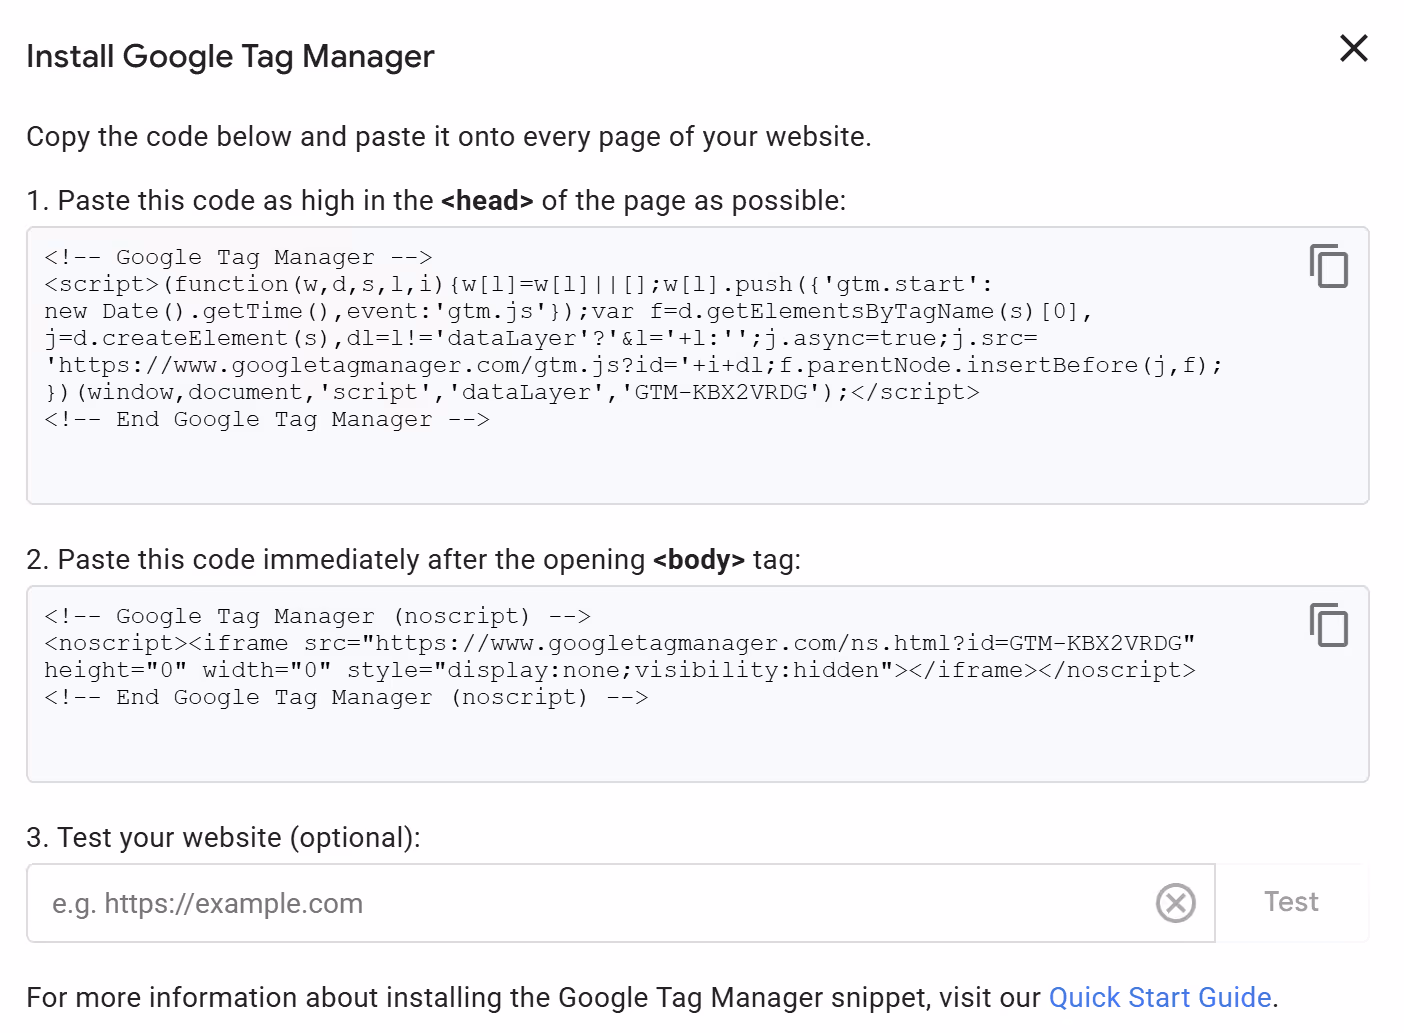
2. Manual Embed (Custom Code Integration)
For full control, you can manually add GTM snippets into Webflow’s Custom Code areas.
This approach is ideal for sites requiring conditional tag loading, data layers, or per-page configurations.
Implementation:
- Create or open your GTM container and copy both code snippets from the GTM dashboard.
- One goes inside <head>
- One goes immediately after <body>
- In Webflow, go to Site Settings → Custom Code.
- Paste the head snippet under Head Code.
- Paste the body snippet under Footer Code (Webflow injects this before the closing </body> tag).
- Save and publish your site.
- Test your installation using GTM’s Preview Mode and tools like GA4 DebugView to ensure tags fire correctly.
Pros:
- Maximum flexibility and control.
- Supports advanced configurations (e.g., environment exclusion, conditional tag firing, or consent-based tracking).
Cons:
- Requires manual setup and testing.
- Slightly more technical than the app-based approach.
Best for: Developers, agencies, or sites needing advanced data layer control and custom workflows.
3. GTM API Integration (For Agencies and Enterprise Use)
For scaling across multiple Webflow projects, you can use the Google Tag Manager API (v2) to automate deployment, manage tags, and sync updates programmatically.
What it Enables:
- Automate tag deployment and updates across multiple sites.
- Standardize container templates for consistent configurations.
- Audit and monitor containers for compliance and version control.
Example Uses:
- Agency-level tag synchronization during multi-site rollouts.
- Programmatically deploying or updating marketing pixels.
- Integrating with Webflow’s API for fully automated analytics setup.
Bonus: Automating Form Tracking Workflows
For dynamic, form-heavy Webflow sites, you can combine Webflow Webhooks with GTM for automated conversion tracking.
Workflow Overview:
- Configure a Webflow webhook to trigger on form submission.
- Send the payload to a serverless function (e.g., AWS Lambda, Google Cloud).
- Sanitize and push the validated data into the GTM Data Layer.
- Trigger GTM events and conversion tags automatically for analytics platforms (like Google Analytics or Ads).
This workflow keeps tracking consistent even as your forms evolve—no need to manually update GTM tags for every new form field.
Step-by-Step: Integrate Google Tag Manager with Webflow
Below are three reliable ways to integrate GTM into your Webflow site, depending on your technical needs and scale.
Option 1: Google Site Tools App (Recommended)
The easiest method for most users is through Webflow’s official Google Site Tools app, which connects Google Tag Manager, Google Analytics, and Google Search Console in one setup flow, no coding required.
In Webflow:
- Navigate to the Webflow App Marketplace.
- Install Google Site Tools for Webflow.
- Log in with your Google account and authorize access to your GTM, GA, and GSC properties.
- Choose your desired GTM container from the app interface.
- The app automatically injects your tracking code into your site’s head and body tags.
- Configure permissions for team members and verify the integration via the app dashboard or Google Tag Assistant.
Best for: marketing and design teams that need a reliable, code-free setup with centralized management for multiple Google services.
Option 2: Manual Embed (Custom Code Integration)
This method gives you complete control over placement, tracking behavior, and conditional loading. Ideal for advanced analytics or enterprise sites with custom data layers.
In Google Tag Manager:
- Create a new account and container (select “Web” as the target platform).
- Copy both code snippets from the Install Google Tag Manager prompt:
- The first goes inside <head>
- The second goes immediately after the opening <body> tag
In Webflow:
- Open your Site Settings → Custom Code tab.
- Paste the head snippet into the “Head Code” section.
- Paste the body snippet into the “Footer Code” section (Webflow injects this before </body>).
- Save your settings and publish your site.
- Verify the setup using Preview Mode in GTM and GA4 DebugView to ensure tags are firing correctly.
Best for: developers and agencies requiring flexibility over how and where GTM runs.
Option 3: API-Based Integration (Advanced)
For large teams or agencies managing multiple Webflow projects, Google’s Tag Manager API v2 can automate tag deployment and version control across sites.
To implement:
- Use the containers.create and accounts.list endpoints to generate and clone container templates programmatically.
- Use workspaces to manage changes and publish updates at scale.
- Integrate deployment scripts with your Webflow site launch workflows to ensure every project inherits your latest GTM configuration.
- Use GET /accounts/{accountId}/containers for auditing and to confirm parity between containers.
This approach enables multi-site synchronization, compliance auditing, and automated tag rollouts. Perfect for enterprise environments or multi-client agencies.
Step-by-Step: Automating Form Tracking (Optional)
If your Webflow site includes forms, you can extend GTM’s capabilities by integrating Webflow Webhooks and the GTM Data Layer for seamless event tracking.
Setup Overview:
- In Webflow → Project Settings → Integrations, create a webhook for “Form Submission.”
- Send the payload to a serverless function (e.g., AWS Lambda, Google Cloud Functions).
- Validate and sanitize incoming data.
- Push the data into GTM’s dataLayer using custom variables for event type and form name.
- Configure a GTM trigger to fire conversion or analytics tags when that event occurs.
- Test by submitting a form and checking that events appear in Preview Mode.
Benefits:
- Dynamically updates tracking as new forms are added.
- Enables cleaner data flows for marketing automation and CRM syncing.
Best Practices for GTM + Webflow
- Name consistently: Use clear tag names like “GA4 – Pageview” or “Meta – Purchase Event.”
- Test before publishing: Always use GTM Preview Mode to confirm tags are firing.
- Avoid redundancy: Don’t embed the same analytics snippet in both Webflow and GTM.
- Version control: Before major updates, export your container to back up your configuration.
- Combine with consent mode: If required, configure Google Consent Mode to ensure compliance.
- Leverage triggers: Create event-based tags for buttons, form submissions, and scroll depth.
Common Challenges
Duplicate tracking:
If you have both GTM and standalone analytics scripts in Webflow, you may double-count users. Always remove direct embeds when using GTM.
Tag not firing:
Check that your container is published and triggers are correctly defined.
Load time:
While GTM is lightweight, excessive third-party tags can still affect performance — keep your setup clean.
Debugging in Webflow staging:
Webflow staging URLs (webflow.io) may need to be added as additional domains in GTM for Preview Mode to work.
Conclusion
Integrating Google Tag Manager with Webflow centralizes all your analytics, pixels, and marketing scripts into one flexible system.
Whether you’re managing multiple campaigns, tracking conversions, or optimizing site performance, GTM gives marketers and developers the control they need without extra code clutter.
At Composite, we help brands integrate GTM seamlessly to maintain fast, scalable, and insight-driven Webflow sites, especially for clients in fintech, AI, and medtech who need precision tracking and data transparency.
Thinking about integrating Google Tag Manager with Webflow? Let’s talk.
.svg)
.svg)


.avif)


