A step-by-step guide to integrating Marketo with Webflow, covering setup, form mapping, and best practices for marketing automation.
Marketo is a powerful marketing platform used by over 37,000 companies worldwide. Its features make it a valuable tool for synchronising data and automating campaigns.
But on its own, Marketo does little. It needs data about your prospects and customers before it can produce any insights.
That's why integrating Marketo into your website matters. You want your online forms to sync properly with Marketo so that any visitor information is quickly and accurately placed into the system.
If you are using Webflow, Marketo is relatively straightforward to connect. Webflow offers a native Adobe Marketo Engage App that makes this easier than ever. As a Webflow-focused design and development team, we work with many clients on their Marketo setup. While the app makes the process straightforward, having the right configuration in place still makes a significant difference.
Here's what we'll cover:
- What is Marketo?
- What you need to get started
- Techniques for integration
- Best practices for Webflow forms
- Common challenges with integration
What is Marketo?
Marketo, now Marketo Engage, is a marketing automation platform owned by Adobe. It helps teams attract buyers, nurture leads across journeys and channels, sync sales and marketing, and deliver insights that improve marketing performance.
Some of Marketo's core features include:
- Highly targeted audiences. Marketo creates precise segments for your campaigns using automated capture and continuous enrichment of customer profiles, with native CRM integrations to keep sales and marketing data in sync.
- Omnichannel engagement. Execute consistent and personalised campaigns across email, web, mobile, chat, events, webinars, digital ads, and more.
- Personalised content. With integrated generative AI, Marketo creates and personalises content delivered dynamically across channels, testing variations and predicting which content converts best.
- Campaign operations. Marketo automates marketing tasks using marketer-defined rules, generative AI, and user-friendly tooling, including automatic field value updates and lead scoring.
- Sales intelligence. Marketo aligns marketing and sales around the best accounts and leads, connecting to CRMs bi-directionally with native integration.
- Marketing analytics. Out-of-the-box dashboards and customisable reporting give deep visibility into campaign performance.
What you need to get started
You need two things to integrate Marketo into Webflow:
- A Webflow site
- A Marketo account
The Adobe Marketo Engage App is available to all Webflow customers and can be installed directly from the Webflow App Marketplace. Note that you will need an Enterprise plan to integrate Marketo forms into Webflow using the official integration.
Before starting, consider your goals for using Marketo with your site. What data do you want to collect from online forms? How do you plan to use it? This will guide the setup of individual forms and the fields you include in them.
Techniques for Integrating Marketo Forms
If you want to connect a form on your Webflow site to Marketo, you have a few options:
- Embedding directly using code
- Relying on a third-party automation tool like Zapier
- Using the official Adobe Marketo Engage App
In most cases, the official app is the simplest route. Each method has its own tradeoffs, so when deciding your approach, consider your team's technical skill level, project goals, and how much control you need over form behaviour and styling.
Embedding directly with code
It is possible to connect Marketo forms directly in Webflow using custom code. This is worth considering if you want tight control over form appearance and are comfortable with HTML and CSS. Keep in mind that custom code can be cumbersome to maintain over time.
Adobe has documentation on how to create a Marketo form in their Experience League.
Relying on a third-party automation tool
Tools like Zapier, Make, and Kestra can automate the integration between Webflow and Marketo, taking form submissions from your Webflow site and passing them directly to your Marketo account.
The drawback is that it introduces a third-party platform to your stack, which can create complexity around data handling and tracking. These tools also charge per task, which can become expensive at scale. That said, if you are already using them extensively elsewhere, they may be the most familiar option to configure.
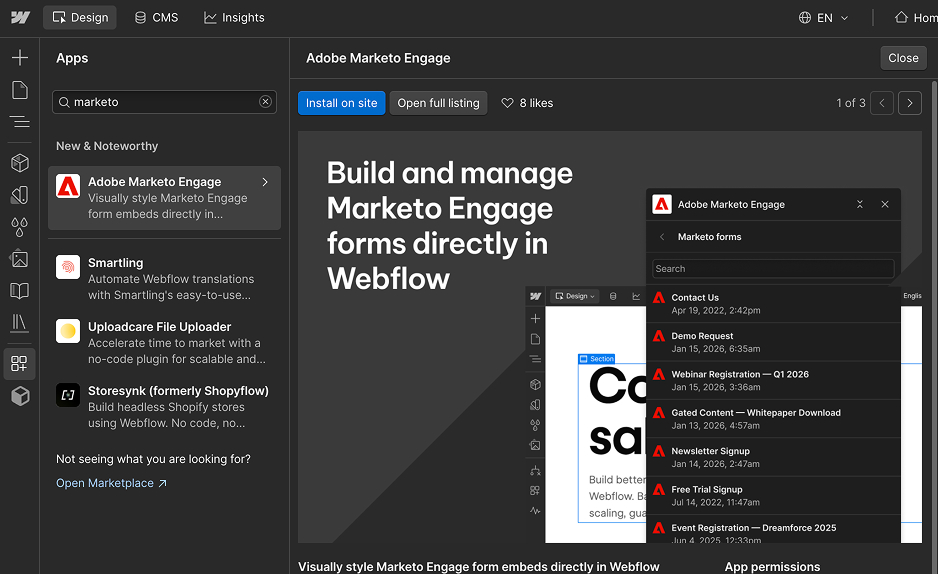
Using the Adobe Marketo Engage App
The Adobe Marketo Engage App for Webflow is the most effective way to connect Marketo forms to your Webflow site. The app is available to all Webflow customers directly from the Marketplace.
Here's what you can do with the app:
- Visually design on-brand Marketo forms directly in Webflow
- See a live visual preview as you build, with the live Marketo form automatically rendered upon publish, preserving structure, styling, and functionality
- Track and manage form submissions in Marketo with built-in tracking, validation, and progressive profiling
Steps to get started with the Adobe Marketo Engage App
- Install the app: Visit the Webflow Marketplace and install the Adobe Marketo Engage App. You will need a Designer site role and permission to create a Marketo Engage Client ID and Client Secret.
- Connect to Marketo: You will need your Munchkin ID and a Custom Service in Marketo to obtain a Client ID and Client Secret.
- Add a Marketo form to your page:
- Go to the site page where you want to add a form
- Launch the Adobe Marketo Engage App
- Click + Marketo Form
- Choose one of your existing Marketo Engage Forms
- Style your form as needed in Webflow
- Publish your site
- Optional: Add a tracking script
- Go to the page with the form
- Launch the Adobe Marketo Engage App
- Click the settings cog icon
- Toggle on "Track user activity on site"
- Publish your site
Once published, all form submissions will be available to view directly in Marketo.
Create a custom installed service in Marketo
This step requires a user set up with API access only. If you don't have one, here is how to create one:
- Log in to Marketo
- Click the Admin tab
- Select Users & Roles from the left-hand panel under Security
- Press Invite New User and fill in the email, first and last names
- Press Next
- Choose Access API as the Role and check API Only
- Press Next, then Send to create the new user
Once you have a user, create a custom installed service by following these steps:
- Log in to Marketo
- Click the Admin tab
- Select LaunchPoint from the left-hand panel under Integration
- Click New under Installed Services and choose New Service
- Give it a Display Name and choose Custom from the Service dropdown
- Give it a Description
- Choose your API-only user under the API Only User dropdown
- Press Create
Copy your Marketo IDs
When connecting your Marketo integration, you'll need three IDs:
Munchkin Account ID
Munchkin is the JavaScript-based tracking service that Marketo uses. To copy the Munchkin Account ID:
- Log in to Marketo
- Click the Admin tab
- Select Munchkin from the left-hand panel under Integration
- Copy the Munchkin Account ID from the Tracking Code section
Client ID
The Client ID registers an application that works with the Marketo API and functions as part of the security protocol.
- Log in to Marketo
- Click the Admin tab
- Select LaunchPoint from the left-hand panel under Integration
- Click View Details on your custom installed service
- Copy the Client ID
Client Secret
The Client Secret is used by Marketo's authentication program to validate your setup.
- Log in to Marketo
- Click the Admin tab
- Select LaunchPoint from the left-hand panel under Integration
- Click View Details on your custom installed service
- Copy the Client Secret

Add the Marketo integration to your Workspace
After copying your three Marketo IDs:
- Open the Account dropdown in the navbar
- Select Workspaces
- Select the Workspace where you'd like to add the integration
Then add the integration:
- Go to Workspace settings > Integrations tab > Marketing automation integrations
- Click "Add marketing integration"
- Add your Client ID, Client Secret, and Munchkin Account ID to the corresponding fields
- Press Add Marketo Integration to save
Map individual forms to Marketo
After connecting Marketo, connect individual forms by following these steps:

Publish your form in Webflow
- Create your form in Webflow if you haven't already
- Publish your site containing the form
- Fully fill out and submit the form to generate a test submission
Each form block should have a unique Form name. Multiple forms with the same name can cause issues.

Map your Webflow form to Marketo
- Go to the site settings of the site containing the form
- Go to Forms tab > Form integrations
- Click "Map New Form"
- Choose Marketo from the Marketing platform dropdown
- Select your form from the Marketing form name dropdown
- Choose your corresponding Webflow form from the Webflow form name dropdown
- Map your Webflow form fields to Marketo lead fields
- Press Connect form
Test your Webflow form
- Open your live site, fill out your form completely, and submit
- Log in to Marketo
- Click the Marketing Activities tab
- Locate your Marketo trigger that starts a Flow linked to the form submission
Best Practices for Using the Adobe Marketo Engage App
Here are some best practices for getting the most out of the app:
- Avoid loading many Marketo forms on the same page, as this can affect site performance. Consider using dedicated landing pages for each form instead.
- Test form submission and data capture on a staging site before going live. After submitting, confirm data is showing up in your databases correctly. Every field should be mapped, including hidden fields and meta form data.
- Follow brand style guidelines for forms. This matters most if you embed external forms. The appearance should align with the look and feel of the rest of your site.
- Focus on accessibility and responsiveness. The Web Accessibility Initiative has several recommendations for making forms as accessible as possible.
- Use hidden fields to capture UTM parameters and other attribution data.
Common Challenges with Integration
Watch for these issues. Left unchecked, they can create larger problems later.
- Data mapping. If you have custom fields or complex databases, make sure data is formatted and aligned correctly from the Marketo form to the database. Errors are more likely when using third-party tools or when forms are particularly complex.
- Tracking code issues. Using third-party tools for integration can interfere with tracking. Double-check your Munchkin setup to confirm it is working correctly.
- Form submissions not syncing. The whole point of integrating Marketo is to keep your marketing data in sync. If submissions aren't flowing through, you lose the value of the integration entirely.
- Lack of editing capabilities. It is not currently possible to edit a Marketo integration on your Webflow Workspace after it has been saved. You will need to delete the integration and create a new one.
Conclusion
Integrating Marketo into your Webflow site is more than a technical exercise. It is a strategic investment in your marketing and sales alignment. Used correctly, Marketo helps you capture high-quality data from your website visitors, automate follow-ups, personalise messaging, and track campaign effectiveness across channels.
With the Adobe Marketo Engage App, this integration is now more capable than ever, giving teams full visual control over form design in Webflow while ensuring reliable data capture and tracking in Marketo. Whether you are starting fresh or migrating from the legacy integration, we recommend installing the app from the Webflow Marketplace to take advantage of the latest functionality.
Whether you use the simplest integration method or a more complex custom approach, success comes down to the details: mapping data fields correctly, ensuring accessibility, testing thoroughly, and keeping a close eye on potential issues like tracking problems or sync failures.
Since our web development expertise is focused on Webflow, and Marketo is such a common marketing automation platform, connecting the two is a regular project for our team. We have partnered with dozens of clients to help them get the most out of both platforms.
Do you have a Webflow site, or want to build one? We'd love to talk.